Introduction
In the previous post I configured a single switch and Wi-Fi access point in the lab to be vlan aware. My real home network has three switches and four access points. I knew this could take hours to reconfigure, so I waited for a day when the family would not be here suffering down time.
I have a Unifi CloudKey2 that hosts a Unifi controller and their Protect video recording and streaming software. I decided to perform a factory reset on this device. But before I did the reset, I started from the periphery of of the network and worked inward, disassociating (forgetting) Unifi devices, so that they would be free to associate with the new network.
Step 1 - Router, switch, and controller
I removed the Unifi USG and listed it on ebay. These gateways retail for $130, but since they are currently on back order, some are selling for $250 used. Fingers crossed. I plugged in the nixos router and connected it to a unifi eight port PoE switch. The switch has no vlans ports defined, so anything connected to it will be on the default network. In the lab, I defined the default network as 192.168.0.0\24. But Unifi devices prefer 192.168.1.0\24 as the default network. That would have been a problem in the lab, as I would have had the same subnet upstream and downstream. So I had to make a quick change in the router now.

I plugged a laptop into the switch but could not get internet access. My cable modem is in bridge mode, but still uses DHCP to assign the public IP address to whatever is plugged into it. I quick modem restart using the Spectrum app got it to give the nix router an IP.
I signed into the controller and adopted the switch. Now I could assign vlan ports and trunk ports on it.
Step 2 - Adding the rest of the network equipment.
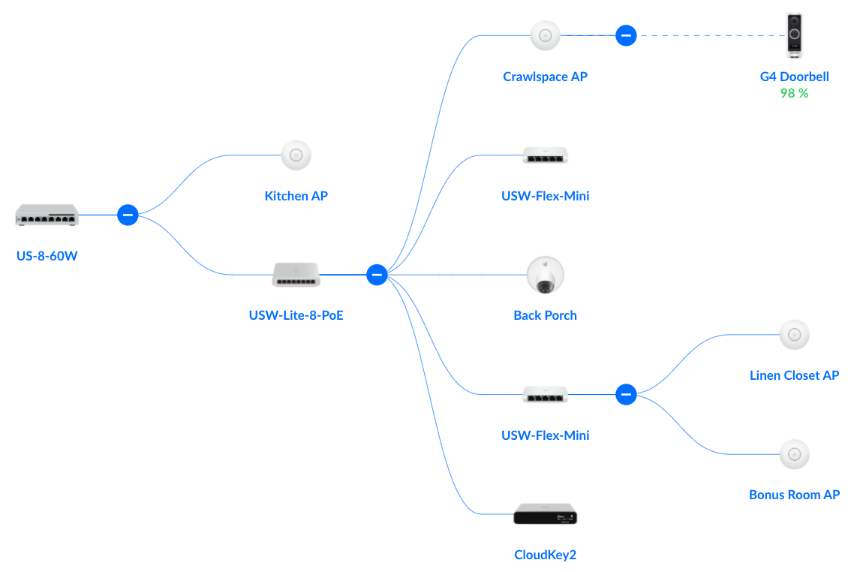
I added an access point to the switch, and now I could connect my laptop to any of the vlans. Finished the job was a simple matter of going around the house, connecting one Unifi device at a time, adopting it, and defining the port profiles. It all went pretty smoothly.

The only challenging part was adding the Unifi G4 doorbell. It notoriously requires a strong Wi-Fi signal, which is difficult with a steel door and foil flashing embedded in the walls. You have to use a smartphone app to adopt the doorbell into the network over bluetooth. I have an access point in the crawlspace, just ten feet from the doorbell, but the doorbell would quickly go into an error state after it connected to Wi-Fi saying it had a weak signal. After a couple hours of trying various means of enhancing the signal strength, I realized that the doorbell, CloudKey2, and maybe even the Iphone needed to be on the same network. I was planning on adding the doorbell to IoT but I remembered that I had the CloudKey2 on the default network since it needed to be able to adopt new devices. Once I added the doorbell to the Wi-Fi network for the default subnet, it connected and reported a sufficient signal. Unifi could have saved me a lot of time by having a separate error message for this.
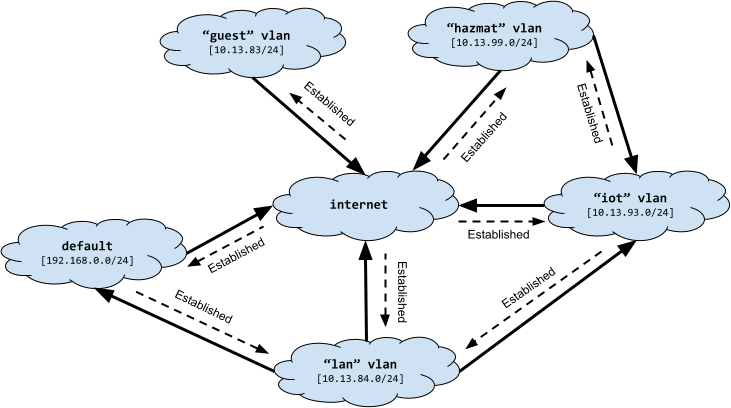
The implication of having devices on the default network that I had considered more IoT-ish, is that I needed to create firewall rules to treat the default network sort of similar to the IoT. While I was at it, I realized that I needed a separate network for my kids. They tend to download dangerous stuff when following directions in forum posts to mod their games. I’m calling the kids network hazmat.

So now lan can establish a connection with default but not vice-versa, just like lan can with iot. hazmat can establish a connection with iot, so the kids can turn lights on and off, etc. hazmat cannot talk to default since it contains sensitive capabilities in the CloudKey2. No camera apps for the kids; they can go look out the window.
Here is the updated forward chain. There is not virtual device for the default network, so we use it’s CIDR range instead.
chain forward {
  type filter hook forward priority 0; policy drop;
  iifname { "enp2s0", "lan", "iot", "guest", "hazmat" } oifname { "enp1s0" } accept comment "Allow All to WAN"
  iifname { "enp1s0" } oifname { "enp2s0", "lan", "iot", "guest", "hazmat" } ct state { established, related } accept comment "Allow established back to All"
  iifname { "lan", "hazmat" } oifname { "iot" } counter accept comment "Allow trusted LAN to IoT"
  iifname { "iot" } oifname { "lan", "hazmat" } ct state { established, related } counter accept comment "Allow established back to LANs"
  iifname { "lan" } ip daddr 192.168.1.0/24 counter accept comment "Allow trusted LAN to Mgmt (default)"
  ip saddr 192.168.1.0/24 oifname { "lan" } ct state { established, related } counter accept comment "Allow established back to LANs"
}
Step 3 - mdns, llmnr, and avahi
Can I get a printer? The brother printer is on IoT. Why? Well, it’s kind of like an IoT device but not really. I trust Brother way more than no-name ESP or Arduino home automation venders. But it still might automatically try to update itself, and reach out to a compromised server. Reading that on the screen, it occurs to me that it’s way more likely that my IED (VSCode) will download a compromised add-on, than my printer, but whatever… The printer is going on IoT, and my computers and phones need to be able to discover it.
Mdns and llmnr are both multicast protocols that devices can use to discover each other on a network. The printer is broadcasting messages on the network so that phones and laptops can find it automatically. But, we have unsolicited traffic from IoT blocked. If these broadcasts could just make it through, then the devices in lan could establish a connection to the printer. That is where avahi comes in. It’s a relay agent for mdns (and maybe llmnr). We allow mdns and llmnr packets to reach the router, specifically from the printer on IoT with this rule.
chain input {
  type filter hook input priority 0; policy drop;
  iifname { "enp2s0", "lan" } accept comment "Allow local network to access the router"
  iifname "enp1s0" ct state { established, related } accept comment "Allow established traffic"
  iifname "enp1s0" icmp type { echo-request, destination-unreachable, time-exceeded } counter accept comment "Allow select ICMP"
  iifname "iot" ip saddr { 10.13.93.11 } udp dport { mdns, llmnr } counter accept comment "multicast for media devices, printers"
  iifname "enp1s0" counter drop comment "Drop all other unsolicited traffic from wan"
}
Avahi re-broadcasts those messages to other networks. It’s configured in the services section.
services = {
  openssh.enable = true;
  openssh.permitRootLogin = "yes";
  ...
  avahi = {
    enable = true;
    nssmdns = true;
    reflector = true;
    interfaces = [
      "lan"
      "iot"
      "hazmat"
    ];
  };
};
Adding Wireguard and FQDN
Check out part four, Adding Wireguard and FQDN
 JJP Software